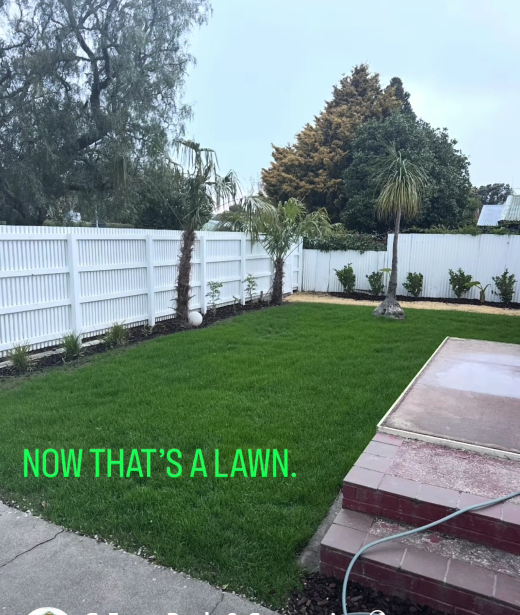
How We Turn Tired Lawns Into Healthy New Grass
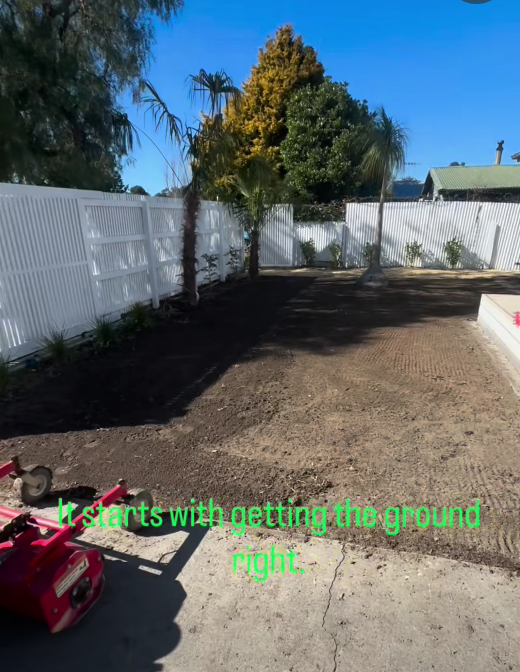
Is your lawn looking tired, patchy, uneven or overrun with weeds? Perhaps years of use have taken their toll, the ground has become uneven, or your lawn has deteriorated to the point where regular mowing and fertilising are no longer making much difference.
Sometimes, a lawn needs a little renovation. Other times, the best solution is to start again.
At G-Force Pools and Contracting, we offer lawn renovation and reconstruction using specialist equipment, including our TurfTeq and sod cutter. Depending on the condition of your existing lawn, we can renovate the surface and introduce new grass seed or remove the old turf and prepare the ground for a completely new lawn.
We typically use a ryegrass blend for around 90% of our lawn reconstruction work, selected according to the requirements of the property.
In this guide, we’ll explain our process, the difference between lawn renovation and full reconstruction, and how to care for your new lawn after the work is completed.
When Should You Consider Lawn Reconstruction?
Not every tired lawn needs to be completely replaced. However, there comes a point when trying to improve the existing grass may not deliver the result you’re looking for.
Lawn reconstruction may be worth considering if your lawn has:
- Large bare or patchy areas.
- Significant weed infestation.
- Uneven surfaces, bumps or shallow depressions.
- Poor grass coverage despite previous attempts at reseeding.
- Unwanted grass varieties taking over.
- Compacted soil that makes it difficult for new grass to establish.
- Damage caused by building work, machinery or other ground disturbance.
- Areas that have deteriorated over time and need a fresh start.
The right solution depends on the existing grass, soil conditions, drainage and the result you’re hoping to achieve.
That’s why we assess the lawn before deciding how much preparation is required.
Our Lawn Reconstruction Process
There isn’t one approach that suits every lawn.
Depending on the condition of the existing grass and the underlying soil, we generally consider two options: renovating the existing lawn or removing the old turf and reconstructing the lawn from the ground up.
Option 1: Renovating the Existing Lawn
If the existing soil is in reasonable condition and the lawn doesn’t require complete removal, we may be able to renovate the surface while retaining the underlying ground.
There are two main approaches we can consider.
Method A: Killing the Existing Grass Before Reseeding
Where the existing grass is undesirable, heavily weed-infested or unsuitable for the finished lawn, we can arrange for the existing vegetation to be killed before beginning the reconstruction process.
This generally involves applying an appropriate grass-killing treatment and allowing sufficient time for it to work.
Any treatment must be used in accordance with the product label, including the required waiting period before disturbing the area or sowing new grass seed.
Once the existing grass has died, we prepare the surface using our TurfTeq.
This specialist equipment helps us work the upper layer of soil, improve the surface and create a suitable seedbed for the new grass.
We then:
- Prepare and level the surface.
- Apply suitable lawn fertiliser where appropriate.
- Sow the grass seed evenly.
- Use our roller to spread a thin covering of topsoil over the seed.
This gives the new grass a prepared surface in which to germinate and establish.
Method B: Scalping the Existing Lawn
If the existing lawn is suitable for renovation, we may be able to cut the grass extremely short, a process known as scalping.
Scalping removes most of the existing leaf growth, allowing us to work closer to the soil surface.
We then use our TurfTeq to prepare the surface and create suitable conditions for reseeding.
After preparation, we apply the new seed and suitable fertiliser before covering the seed with a thin layer of topsoil using our roller.
This approach can be effective when the underlying soil is suitable and removing the entire existing lawn isn’t necessary.
However, scalping doesn’t eliminate established roots, unwanted grass varieties or weeds. The suitability of this method depends on the condition of the existing lawn and what we’re trying to achieve.
Option 2: Full Lawn Reconstruction Using a Sod Cutter
Sometimes, renovating the existing lawn simply isn’t enough.
If the lawn has a thick root mat, contains a substantial amount of unwanted vegetation or needs a more thorough reset, removing the existing turf may be the better option.
This is where our sod cutter comes in.
A sod cutter slices beneath the existing grass, allowing us to remove the turf and much of the established root mat in strips.
Removing the old turf gives us a cleaner starting point and allows us to prepare the underlying soil for a new lawn.
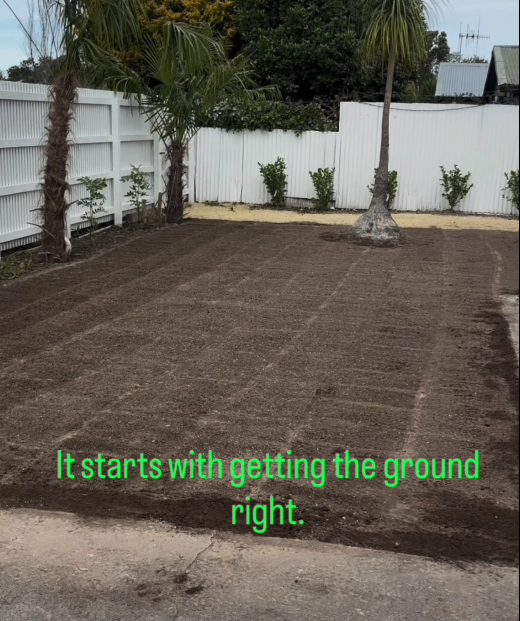
Once the existing turf has been removed, we use our TurfTeq to cultivate and prepare the exposed ground.
The aim is to produce a reasonably fine, even soil surface, often referred to as a seedbed with a suitable tilth.
We also address surface irregularities where necessary, helping create a consistent area for the new grass to establish.
The next steps are to:
- Prepare and level the soil using our TurfTeq.
- Address any obvious surface or soil issues identified during preparation.
- Apply suitable lawn fertiliser.
- Sow the grass seed evenly.
- Use our roller to cover the seed with a thin layer of topsoil.
The result is a newly seeded lawn established on a prepared surface rather than an attempt to improve the old grass.
Full reconstruction involves more preparation than a standard renovation, but it can be the better solution when the existing lawn is unsuitable for the result you want.
Why We Use a Ryegrass Blend for Most Lawns
Around 90% of the time, we use a ryegrass blend for our lawn reconstruction projects.
There are several reasons ryegrass is a practical choice for many residential lawns.
Relatively Fast Germination
Ryegrass can germinate relatively quickly when soil temperatures and moisture conditions are suitable.
Under favourable conditions, the first seedlings may appear within approximately 5–10 days.
However, germination is only the beginning. The grass still needs time to develop roots, thicken up and become established.
Good Wear Tolerance
Suitable perennial ryegrass varieties can provide good wear tolerance, making them useful for many family lawns and areas that receive regular use.
Once established, the grass can cope with normal everyday activity, provided it is maintained appropriately.
An Attractive Green Lawn
Ryegrass can produce an attractive, green lawn with a relatively fine appearance, depending on the varieties included in the blend.
It can be a practical option for homeowners wanting a lawn that looks good while remaining functional.
Choosing the Right Seed
No single grass variety is ideal for every property.
Factors such as shade, drainage, soil conditions, exposure and expected foot traffic all influence which seed is most appropriate.
For example, heavily shaded areas may require a different blend from a sunny, exposed lawn.
We select the seed according to the requirements of the property rather than assuming the same solution will work everywhere.
Why Proper Ground Preparation Matters
One of the biggest mistakes people make when trying to establish a new lawn is concentrating on the seed while overlooking the ground underneath it.
Good-quality seed is important, but it won’t compensate for poor preparation.
If the surface is uneven, the soil is heavily compacted or the seed sits on top of the ground without sufficient contact, germination and establishment can be inconsistent.
Our TurfTeq helps us prepare the surface mechanically, producing a suitable seedbed for the new grass.
The aim is to achieve:
- A reasonably fine, even soil surface.
- Good contact between the seed and the soil.
- Fewer large clods and surface irregularities.
- A consistent area for germination.
- Suitable conditions for the new grass to establish.
We also consider whether additional topsoil is needed and whether drainage, compaction or existing soil conditions could affect the finished lawn.
Proper preparation gives the grass a better starting point and can make a significant difference to the final result.
Covering the Seed With Topsoil
Once the ground has been prepared, the seed has been spread and fertiliser applied, we use our roller to cover the seed with a thin layer of topsoil.
Our roller applies approximately 5–7 mm of topsoil before any additional compaction.
We don’t carry out separate compaction at this stage. The weight of the roller itself is all that’s applied.
The purpose of the topsoil covering is to help retain moisture around the seed, protect it from drying out and provide suitable conditions for germination.
The covering must remain thin enough for the emerging seedlings to reach the surface.
Too much soil can bury the seed too deeply, resulting in delayed or uneven germination.
Once the work is complete, watering becomes one of the most important factors in getting the new lawn established.
Aftercare: How to Look After Your Newly Seeded Lawn
The work doesn’t end when the seed is in the ground.
The first few weeks are critical to successful establishment, and what happens during this period can have a significant impact on the finished lawn.
Watering, mowing and keeping traffic off the area all play an important role.
Here’s what you need to know.
1. Watering: The Most Important Part of Establishment
Grass seed needs consistent moisture to germinate.
If the seedbed dries out during this stage, germination can be delayed or become patchy. This is particularly important in Hawke’s Bay, where warm temperatures, dry weather and wind can quickly dry out exposed soil.
The goal is to keep the upper layer of soil consistently moist without saturating it or washing the seed away.
During germination
Water lightly and regularly, adjusting the frequency to suit the weather and soil conditions.
In warm, dry or windy conditions, the surface may dry out quickly and require more frequent watering. During cooler weather or periods of rain, less water may be needed.
Check the surface regularly rather than relying on a fixed watering schedule.
Use a gentle spray rather than a heavy stream of water. Excessive pressure can move the seed, create channels and leave some areas with too much seed and others with too little.
You want the seedbed moist, not waterlogged.
As the grass begins to emerge
Continue watering sufficiently to prevent the young seedlings from drying out.
At this stage, the new grass has a limited root system and is particularly vulnerable to dry conditions.
Avoid allowing the surface to dry completely between watering sessions.
As the lawn establishes
Once the grass is growing well and the roots are developing, gradually reduce the frequency of watering while increasing the amount applied at each watering, where appropriate.
This encourages the roots to grow deeper into the soil rather than remaining close to the surface.
As the lawn matures, move towards deeper, less frequent watering, taking rainfall and soil conditions into account.
The key is to provide consistent moisture during germination and then encourage deeper rooting as the grass establishes.
2. When Is Your New Lawn Ready for Its First Mow?
Mowing too early can damage a newly seeded lawn.
Although ryegrass can germinate relatively quickly, the grass needs time to develop sufficient height and establish its roots before the first cut.
As a general guide, aim for a grass height of approximately 75–100 mm before the first mow.
Depending on the season and growing conditions, this may take around 3–5 weeks, although it can take longer in cooler weather or where growth is slow.
Don’t rely on the calendar alone. Check the grass itself before deciding to mow.
Look for these signs:
- The grass has reached approximately 75–100 mm in height.
- Growth is reasonably consistent across the lawn.
- The seedlings are sufficiently rooted that they won’t be pulled out by the mower.
- The ground is firm enough to support the mower without rutting or marking the surface.
How Much Should You Cut Off?
For the first mow, aim to remove approximately 20–30 mm of growth, leaving the grass around 50–70 mm tall.
For example:
- Grass height before mowing: 90 mm.
- Amount removed: 25 mm.
- Grass height after mowing: 65 mm.
The aim is to tidy the lawn without putting unnecessary stress on the young grass.
Use a sharp mower blade and avoid turning sharply on the new lawn.
Don’t mow when the soil is wet enough for the mower wheels to damage the surface or pull out the young grass.
If some areas are growing more slowly than others, wait until those areas are sufficiently established.
After the first mow, gradually bring the lawn down towards your preferred mowing height over subsequent cuts.
Avoid removing more than one-third of the grass blade in a single mow.
The first mow should encourage healthy establishment, not produce a closely cut lawn straight away.
3. How Long Should You Stay Off the New Lawn?
Freshly seeded grass needs time to develop a root system strong enough to cope with foot traffic.
Occasional access to check the watering is fine, but regular walking, children playing and pets running across the area can disturb the seedlings and damage the surface.
As a general guide, aim to keep normal foot traffic off the lawn for at least 3–4 weeks.
Allow longer if the grass is still establishing or the soil remains soft.
For regular family use, approximately 6–8 weeks or longer may be necessary, depending on growing conditions and how well the grass has established.
Before allowing normal use, check that the grass is well rooted and that the surface can withstand foot traffic without being damaged.
Avoid parking vehicles, placing heavy equipment on the lawn or repeatedly walking over the same areas during establishment.
Giving the lawn time to develop properly will help protect the work that has been carried out.
4. What About Fertiliser?
Fertiliser can support healthy growth, but the type and timing matter.
During reconstruction, we can apply a suitable lawn fertiliser to support establishment, taking the soil condition and product instructions into account.
Once the lawn is established, an appropriate maintenance fertiliser can help maintain healthy growth and colour.
More fertiliser isn’t necessarily better.
Applying excessive amounts, particularly when the grass is young, can damage the seedlings. Always follow the product’s application rate and watering instructions.
The timing of subsequent applications will depend on the fertiliser used, the grass variety, the season and the condition of the lawn.
5. What If the Lawn Looks Patchy?
Don’t panic if the lawn doesn’t look perfect after the first week or two.
Grass seed doesn’t always germinate evenly, and different parts of the property can have different soil temperatures, moisture levels and growing conditions.
Some areas may establish faster than others.
Continue watering appropriately and give the grass time to grow before deciding whether more seed is needed.
If bare patches remain once the surrounding grass has established, they may need to be reseeded.
However, patchiness can also indicate an underlying problem, such as:
- Insufficient moisture.
- Seed being washed away.
- Poor seed-to-soil contact.
- Soil that is too wet.
- Compacted ground.
- Uneven seed distribution.
Identifying the cause is important. Otherwise, you risk repeating the same problem.
6. When Can You Apply Weedkiller?
Be careful when using weed treatments on a newly seeded lawn.
Some products can damage or kill young grass, even when they’re designed for lawns.
Don’t apply weedkiller simply because weeds appear alongside the new grass.
Check that the product is suitable for the grass species and that the lawn has reached the establishment stage specified on the label.
If you’re unsure, seek advice before applying any treatment.
Early lawn care should focus on encouraging the new grass to grow strongly. As the lawn thickens, it will be better placed to compete with weeds.
7. How Long Until the Lawn Looks Finished?
This depends on the time of year, weather, watering, soil conditions and the grass seed used.
Under favourable conditions, ryegrass may begin germinating within approximately 5–10 days.
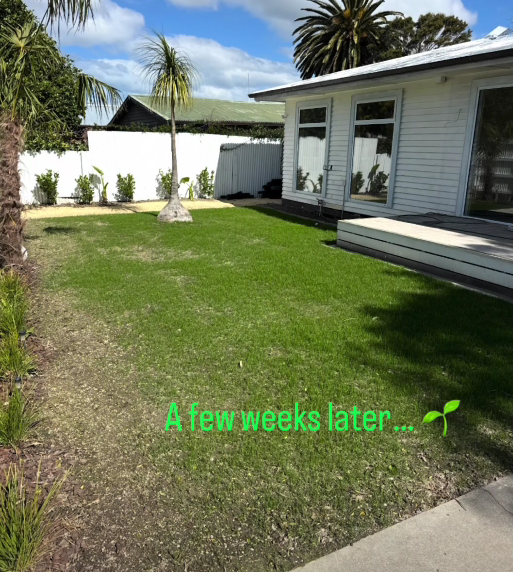
Over the following weeks, the grass should develop, thicken and begin to create a more uniform appearance.
Allow around 6–8 weeks or longer for substantial establishment, with additional time potentially required before the lawn is ready for regular use.
Cooler temperatures, dry weather and unsuitable soil conditions can slow the process considerably.
Remember that green growth doesn’t necessarily mean the lawn is fully established.
Patience and consistent aftercare are far more useful than trying to rush the process.
When Is the Best Time to Reconstruct a Lawn in Hawke’s Bay?
Lawn reconstruction can be carried out at different times of the year, but the season affects how quickly the grass establishes and how much aftercare is required.
Spring and early autumn are often favourable periods for reseeding, provided soil temperatures and moisture conditions are suitable.
In Hawke’s Bay, autumn can offer a useful combination of warm soil and cooler air temperatures. However, the ground still needs sufficient moisture for germination, and the young grass needs time to establish before colder weather slows growth.
Spring can also be suitable, although drying winds and increasingly warm conditions may mean more attention to watering.
Summer reconstruction is possible, but it generally requires closer watering management. Hot, dry weather can make it difficult to keep the seedbed consistently moist.
Winter growth may be slower, depending on soil temperature and local conditions.
The best time for your property depends on the existing lawn, the work required and the weather forecast.
Lawn Renovation and Reconstruction in Hawke’s Bay
Every lawn is different, and the best approach depends on its condition.
Sometimes, renovating the existing lawn is enough. In other cases, removing the old turf and rebuilding the seedbed provides a better starting point.
At G-Force Pools and Contracting, we use specialist equipment, including our TurfTeq and sod cutter, to prepare lawns for reseeding.
Our process focuses on assessing the existing lawn, selecting an appropriate preparation method and creating suitable conditions for the new grass to establish.
Whether your lawn has become patchy, uneven, tired or difficult to maintain, we can help you work out the best way forward.
Thinking about giving your lawn a fresh start?
Contact G-Force Pools and Contracting to discuss lawn renovation and reconstruction in Hawke’s Bay.
We’ll assess your lawn and help determine the most appropriate approach for your property.